Quantcast
Channel: Little Miss Bento  シャリーのかわいいキャラベン
Viewing all 521 articles
Browse latest View live

Sheep Bento 羊のキャラ弁

$
0
0
 
Baa~Baa~~ Today is Sheep Bento!

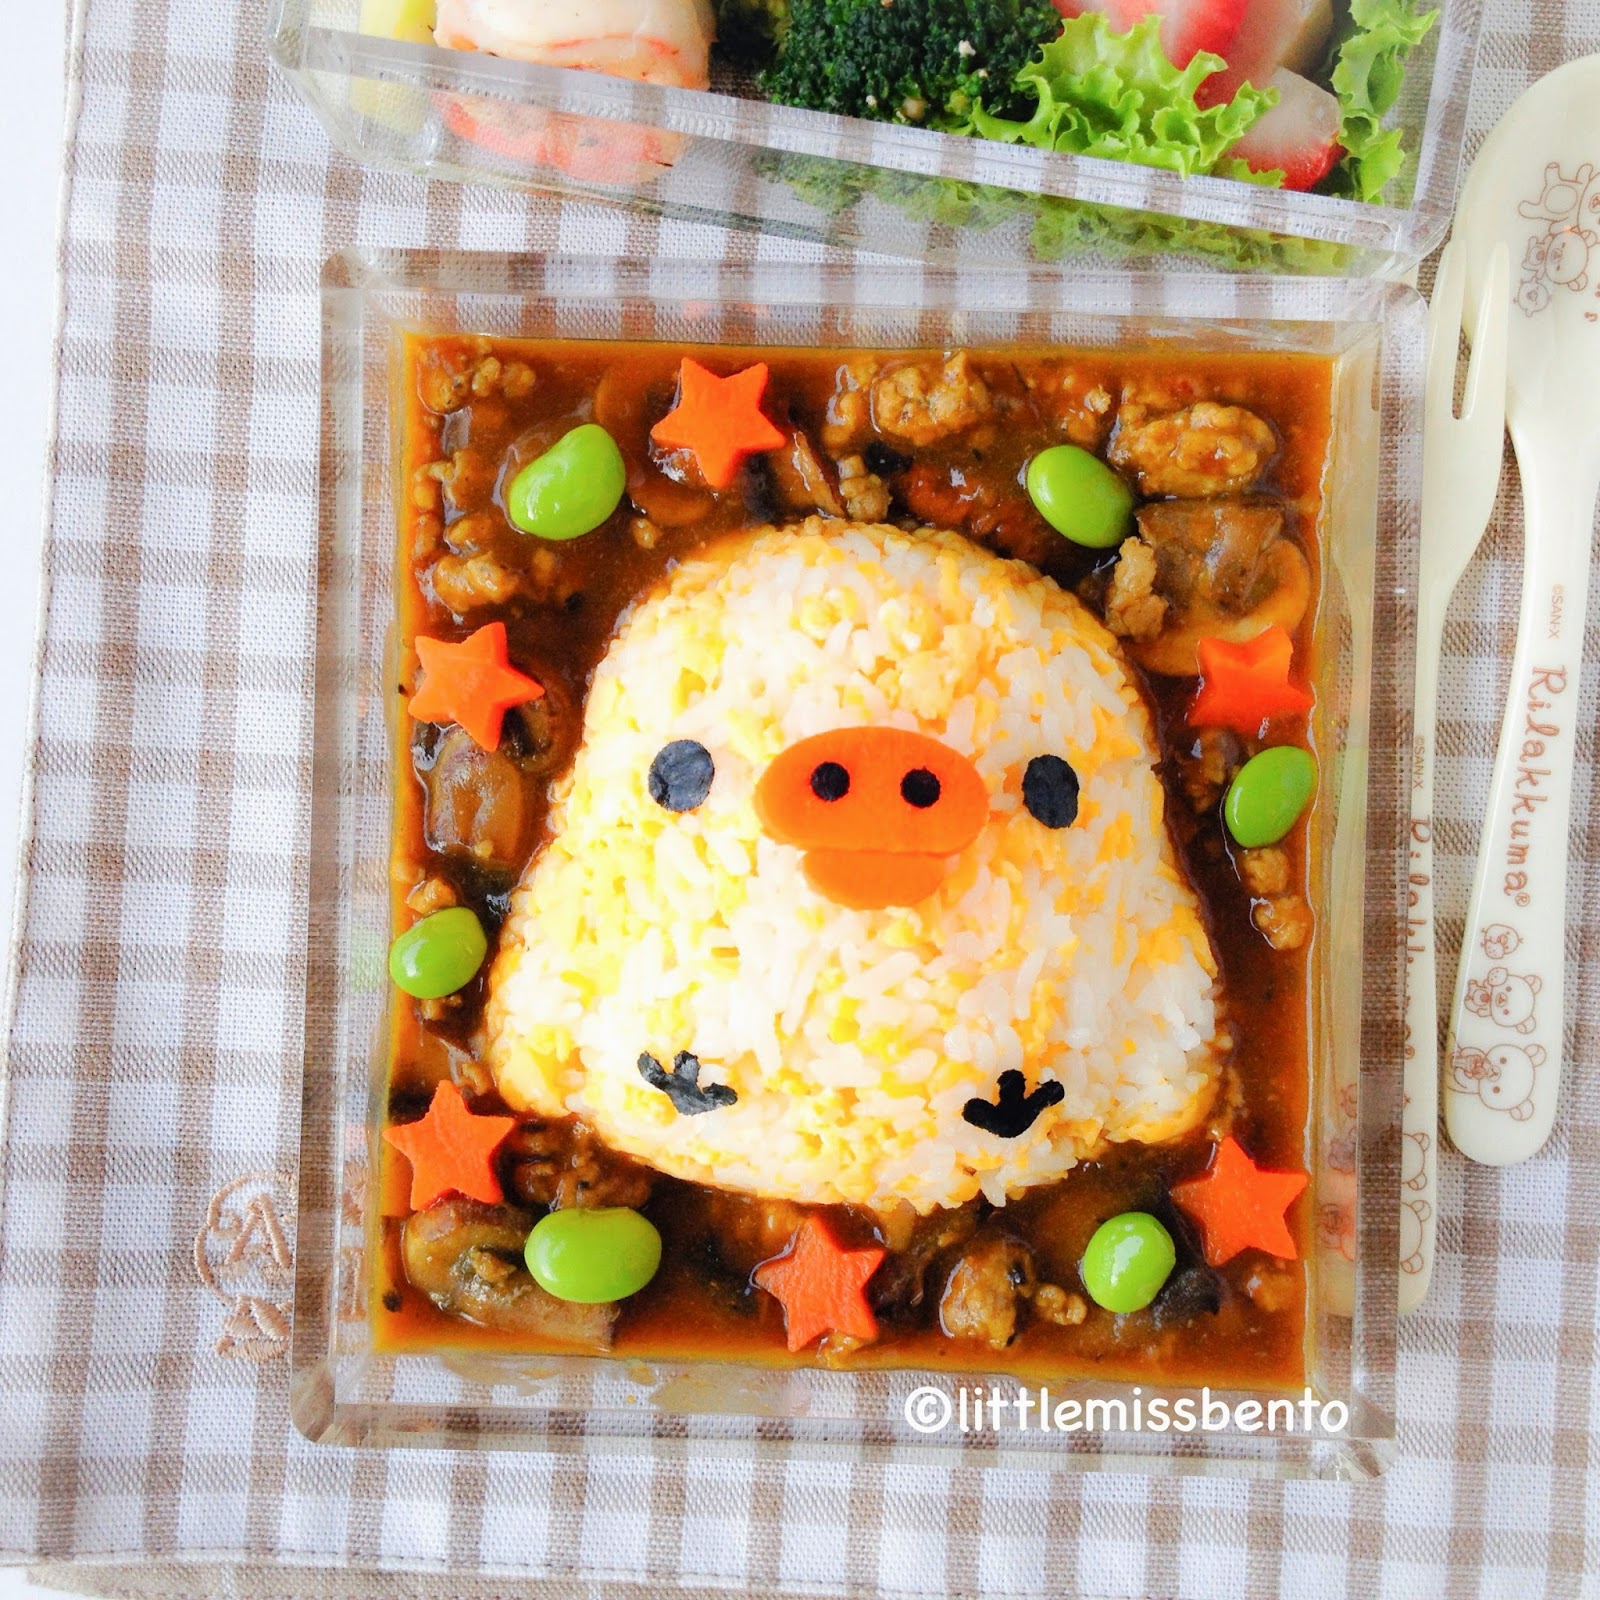
HAHA still under the ‘influence’ of my New Zealand trip, yes the other animal that I kept seeing (often in huge numbers) was sheep! Aside from cow, I am sure the one animal that is often associated with New Zealand is sheep.

The scenery in the northern island of New Zealand is often of mountainous terrains and huge farmlands with sheeps, cows and the occasional horses.

今日は羊のキャラ弁です。キャラ弁を作ることが楽しかったんです。ニュージーランドの旅行でたくさんの羊を見ましたね~

キャラクターの部分
羊さん(飯、照り焼きソース、海苔、かまぼこ)

キャラ弁のおかず:焼き豆腐、ブロッコリー、ニンジン、豚挽き肉のパテ、レタス、きのこのソテー。
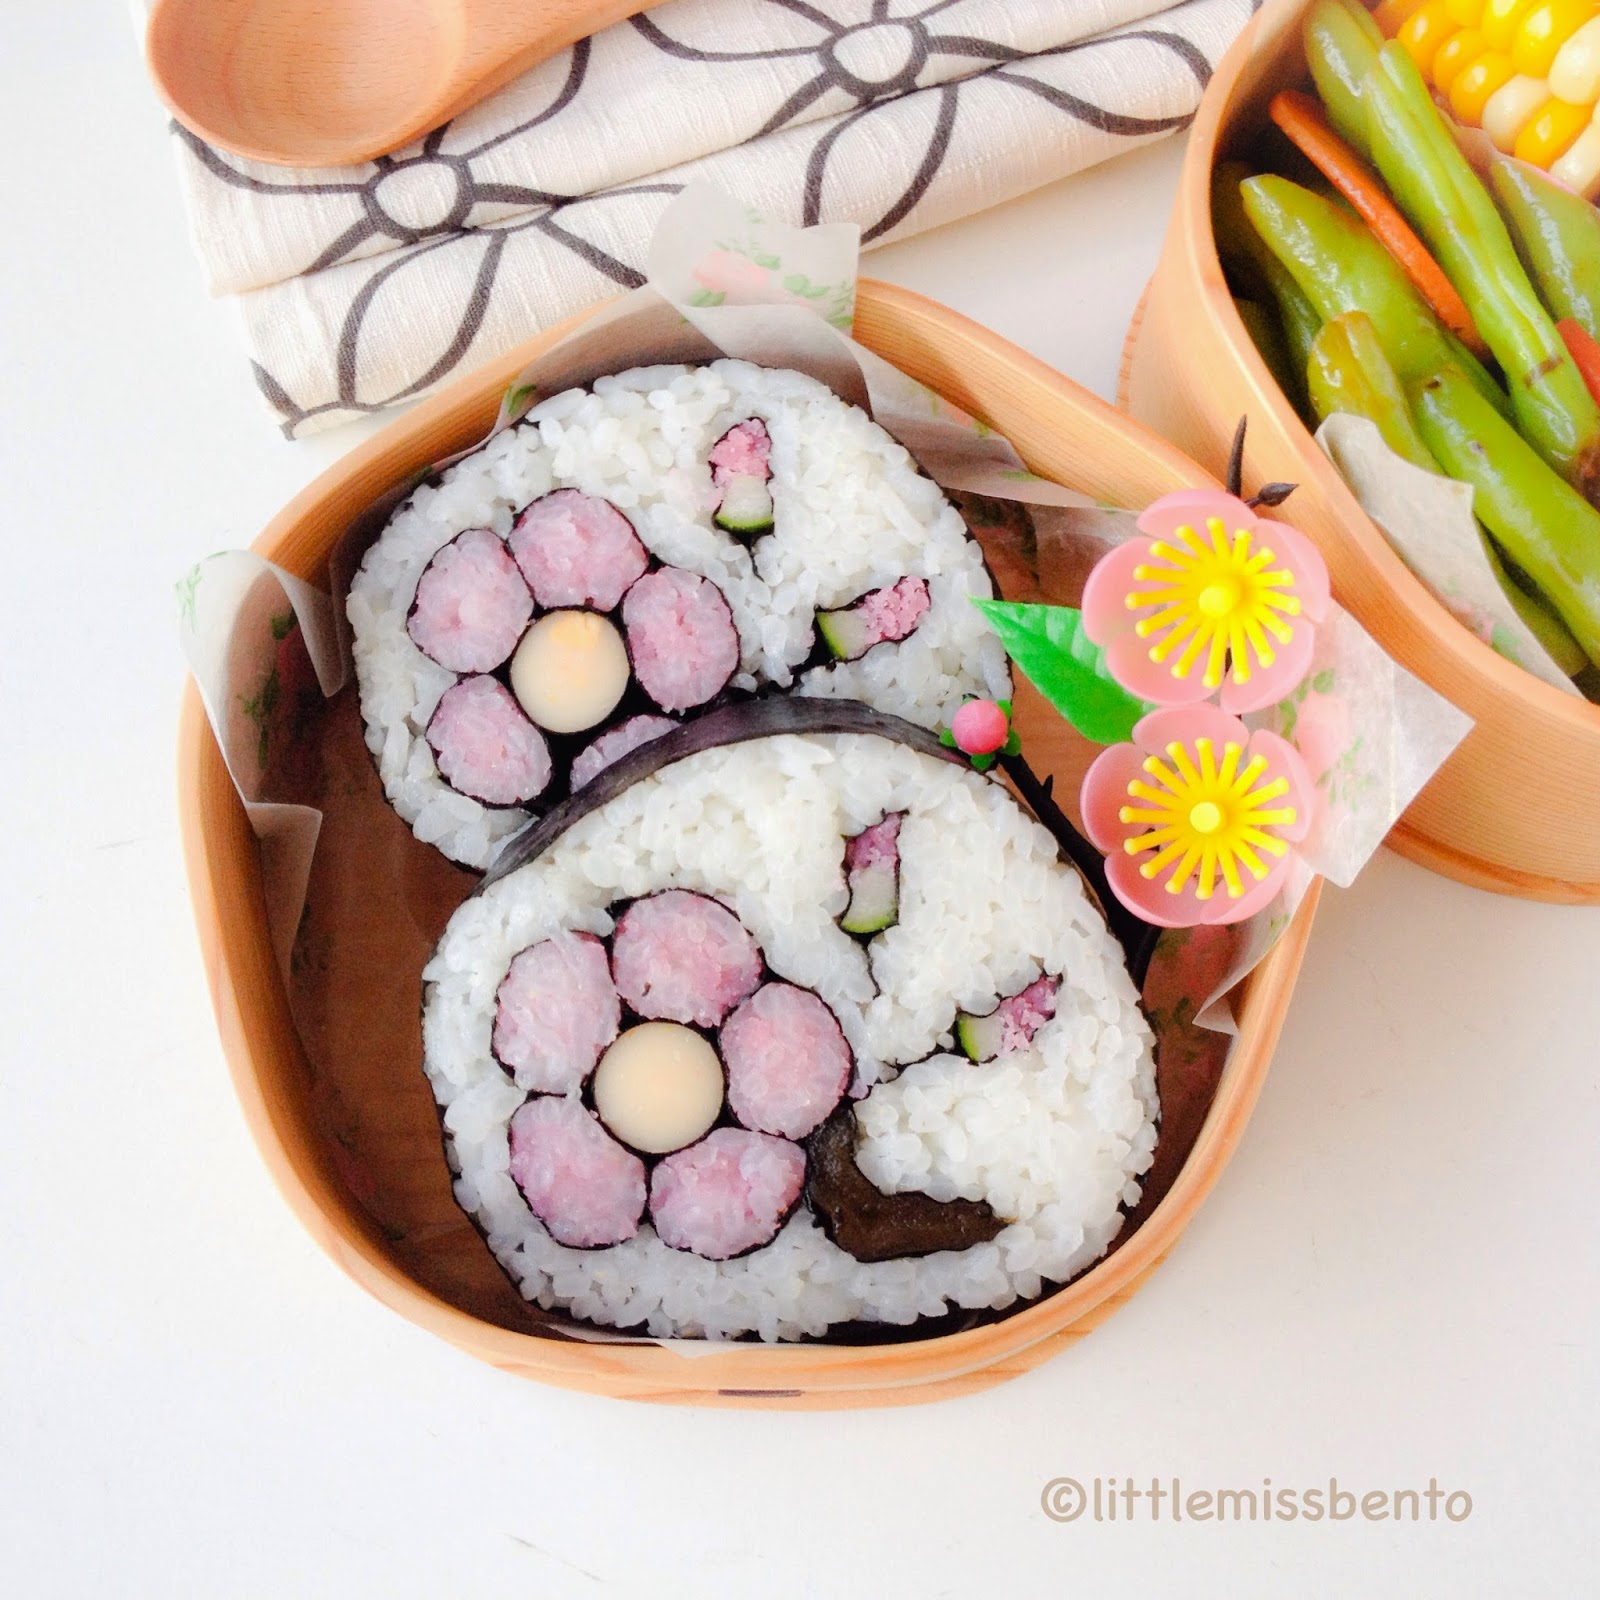
I am quite happy with the final look of the sheep characters in this bento! I packed the rice loosely, to create the sheep’s wool. I think it worked pretty well – yay!

After making these two sheeps, I really felt like ‘hugging’ them :D

The side dishes for today’s bento were sautéed tofu squares, sauteed mushrooms with truffle oil, blanched broccoli and carrots, grilled minced pork patties, and some lettuce.

Hope you like this Sheep Bento!!

ニュージーランドの旅行でアグロドームへ行きました。アグロドームは観光牧場です。総敷地面積が350牧場ですよ。あるファームショー(羊の毛刈りショー)をしました。19種類の異なる羊達や迫力ある毛刈りを間近で見えました。面白かったです!

ショーの後はトラクターに揺られながら牧場内を巡るファームツアーをしました。フレンドリーな動物達に出会えました。

During my trip, I visited the Agrodome to experience and learn about farming activities and their sheep! The Agrodome is a 350 acres sheep and cow farm.
We signed up for the Agrodome Farm Show, which was an hour-long show session to introduce 19 different breeds of sheep – very cool!! It was really interesting to see the different sheeps. There was live sheep shearing performance and the show presenter even hosted a faux sheep auction. We also watched the farm dogs herding sheep (and ducks!) and performing stunts.  
Following the sheep show, I joined the Agrodome Farm Tour to explore a real working farm and was introduced to a variety of farm animals. There were cows, deesr, llamas and alpacas, even ostriches, and of course many more sheep. The tour also allows participants to get close to the animals and even hand feed them.
The Agrodome (アグロドーム)
About 10mins drive from Rotorua City Centre
Tickets are applicable for Farm Show and Farm Tour

Blog post disclaimer: No monetary compensation was received for this post. Author paid for all the costs involved in attending the farm show and tour at Agrodome. 


Follow my food art and bento creations on Facebook, LIKE my page here. :)

キャラ弁ランキング
ブログのランキングに参加中。よろしければクリックしてくださいね♪ ありがとう
Please support my blog ranking! Please just click the button below as the clicks will go towards the ranking! Thank you so much
↓ ↓ ↓ ↓ ↓ ↓ ↓  ↓  
にほんブログ村 料理ブログ キャラ弁へ 

Recipe for Olaf the Snowman Sushi Art Roll (Kazarimaki-sushi)

$
0
0
“Hi I’m Olaf and I like warm hugs!”
“I love you Olaf!”

Awww doesn’t Olaf, the super cute snowman from Disney’s Frozen just melts your heart?

Olaf the snowman has a goofy, innocent and extremely loveable personality. I am sure many children and even adults love this character from the movie.

I decided to make a Olaf the Snowman Sushi Art Roll (kazarimaki-sushi)! This is my very own creation~ I simply used my experience in making sushi art rolls (kazarimaki-sushi) and created it. Of course, I had to do some planning the night before, including sketching the designs and deciding on the ingredients to be used.

So so happy I managed to make this!

Olaf the Snowman Sushi Art Roll Recipe

Serving - makes 4 large sushi slices
Level - advanced
Ingredients
1.75 cups cooked sushi rice 
3 x 10cm long sweet gourd strips (kanpyo) – this is for the button on Olaf’s body
1 tsp ground sesame – this is to color Olaf’s mouth
2 x 10cm Japanese fishcake strips (kamaboko) – this is for the teeth
1 small triangular 10cm carrot strip – this is for Olaf’s nose
6 seaweed sheets
6-7 packets of pink deco furikake – this is to color the rice pink
Slice cheese – this is for the base of Olaf’s eyes

I also included some pictures of the making this Olaf the Snowman Sushi Art Roll, which I believe would be interesting and fun! Hope you like this special recipe!

Steps
1. Prepare and cut the carrot strip, fishcake strips (kamaboko), gourd strips (kanpyo). They need to be about 10cm in length. 
2. Add ground black sesame to about 25g of sushi rice, mix well to color it dark grey. 
3. Wrap the fishcake strips with seaweed all around and between the two strips, this is for Olaf's teeth. Wrap the gourd strips (kanpyo) into 3 separate rolls with about 1/3 seaweed sheet each.  
4. On 2/3 seaweed sheet, lay the fishcake strips from step 3 in the center. Add the rice from step 2, forming a mountain like shape. Roll the sushi, this completes Olaf's mouth. 
5. On 1 seaweed sheet, spread about 30g of rice. Add the carrot strip in the centre, top up with about 10g of rice. Add the mouth from step 4 with the horizontal side downwards. Top up with addition rice to cover the mouth. Roll the sushi to complete Olaf's head. 
6. Spread rice on 1/2 sheet of seaweed and place one gourd strip from step 3, top up with additional rice if needed, roll the sushi. You need about 15g of sushi rice.
7. Spread rice on 2/3 sheet of seaweed. Place 2 gourd strips from step 3, top up with additional rice if needed, roll the sushi. You will need about 50-60g sushi rice. 
Step 6 and 7 completes the body for Olaf. 
8. Spread 10g on 1/3 sheet of seaweed, roll the sushi. Repeat. This is for Olaf's feet. 
9. Add pink deco furikake to the remaining sushi rice and mix well to color it light pink. 
10. Join 2 seaweed sheets together using some sushi rice (smash a few sushi rice grains, it will be sticky and can be use to 'glue' the sheets together)
11. Spread some pink sushi rice on the centre of the seaweed. About 8cm length, start stacking the parts togeher. From Olaf's feet (from step 10), to Olaf's body (from step 6,7) and Olaf's head (from step 5). You will need to add the pink sushi rice as you go along, to fill in the gaps and maintain the position of the different parts. 
12. Add final layer of pink sushi rice around and roll up the sushi. Make sure the sushi roll is rolled tightly. 
13. Divide the sushi roll into 4 pieces. 
14. Add the eyes (seaweed and slice cheese), eyebrows (seaweed) and hands (seaweed). 

Follow my food art and bento creations on Facebook, LIKE my page here. :)

キャラ弁ランキング
ブログのランキングに参加中。よろしければクリックしてくださいね♪ ありがとう
Please support my blog ranking! Please just click the button below as the clicks will go towards the ranking! Thank you so much
↓ ↓ ↓ ↓ ↓ ↓ ↓  ↓  
にほんブログ村 料理ブログ キャラ弁へ 

Father's Day Car Bento Recipe 父の日「車のキャラ弁」作り方

$
0
0
A subtle Father's Day theme bento today! Slightly ahead of time since I probably will not be making bento over this weekend. 

For today's bento, my Oyako Kingyo bento box from Bento&co. Mine is the black version. The red one is still available on Bento&co's online store. This adorable set of goldfish shaped bento boxes, one big and one small - perfect for Father's Day theme!
Inspired by a very good friend of mine, Japanese bento blogger Maki-san from cuteobento, I decided to try making some sweet potato patties for my Father's Day Car Bento today!

I used vietnamese Japanese sweet potato and made them into car shaped patties for this simple and fun bento. I then added Father bear and Baby bear characters using some slice cheese and edible pen to draw the features. 

I do however find that the yellow color of the sweet potato patties a little dull, I must find the opportunity to try the authentic Japanese sweet potato soon and see if there is any difference. 

The side dishes for this Father's Day Bento was baked salmon, mushrooms with tofu stir fry drizzled with some truffle oil, sauteed french beans with carrots, and lettuce. 
My recipe is below and I hope you will like it. When served hot, it was crisp on the outside, with that soft sweetness of the sweet potato on the inside. 

This recipe is so simple! You can either shape the sweet potato into shapes as you desire, or you can use cutters like me. :)

I used a car shape cutter. It comes in two parts. One is the outer shape, while the other enables me to make the imprints.


Recipe - Kawaii Sweet Potato Patties for Bento

(makes about 10-12 small sweet potato patties)

Ingredients
100g mashed sweet potato
1 egg yolk
1tsp mochi flour
1tsp potato starch
1/4 tsp salt
salad oil

Method
1) Wash the sweet potato, steam the sweet potato until cooked through. 
Tip: Keep the skin on. If you peel it beforehand, you might risk the sweet potato turning grey! After it is steamed and cooked through, you can easily peel the skin away. 
Tip: Use a skewer to test if the sweet potato is cooked through. if it is cooked through, the skewer would easily pierce through the flesh with gentle force.
2) Peel and remove the skin completely, leaving only the flesh of the sweet potato. 
3) Mash the sweet potato. Add in the egg yolk, mochi flour, potato starch and salt), mix well. 
4) Once cooled enough to mold using your hands, shape the sweet potato paste from step 3 into round balls. Flatten the balls, then cut the shapes using your cutter to make the patties.
5) Press the other part of the cutter on the sweet potato patties from step 4 to make the imprints. 
6) Heat some salad oil in a non stick saucepan, pan fry the sweet potato patties (with the imprint side facing downwards first) under low heat until lightly brown, flip over and fry the other side. 
7) Remove from pan and pack it in your bento :) or simply serve it as a side dish or snack. Super yum!
Follow my food art and bento creations on Facebook, LIKE my page here. :)

キャラ弁ランキング
ブログのランキングに参加中。よろしければクリックしてくださいね♪ ありがとう
Please support my blog ranking! Please just click the button below as the clicks will go towards the ranking! Thank you so much
↓ ↓ ↓ ↓ ↓ ↓ ↓  ↓  
にほんブログ村 料理ブログ キャラ弁へ 

Liang Court- Tanabata (Japan Star Festival)

$
0
0
As many of you know, I am such a huge J-fan :P Liang Court is also one mall I visit often, for Medi-ya supermarket to stock up my Japanese produce and goods, Marutama for yummy ramen, Saizariya for super value Japanese fusion western food, Dulce & Studio for their amazing cakes etc......

Liang Court will be launching a Tanabata (Japan Star Festival) from 26 Jun to 10 Aug 2014. 

Tanabata (七夕) is the Japanese version for Chinese Star Festival (乞巧节), commonly referred to as Chinese Valentine’s Day. Held on July 7th, the festival celebrates the reunion of the Cowherd & Weaver Girl, who were separated by the Milky Way and were allowed to meet just once a year. 

Festival Happenings
The key events during Tanabata @ Liang Court includes MEIDI-YA Supermarket's Summer Fair, Japanese social event Machidon and the mall's signature Food Trail. 

Not only will MEDI-YA Supermarket be introducing a variety of fresh harvest from Japan under the Summer Fair, they have also specially arranged to ship in Tanabata festive products! Cool, I am curious to check this out!!

At the Farmer's market from 27 June to 10 July 014, Shoppers will get to play traditional games such as Yoyo Fihsing, Ball Scooping & 1000 strings at the mall's atrium. 

Machicon might be new to some (its quite new to me too!). It is actually a large scale social event hugely popular in Japan where participants meet new friends over dinner. Returning to Singapore for the third time and held exclusively at Liang Court, participants will get to rotate around 12 participating resaurants and cafes on 7 July 2014 to meet new friends. Ticketing applicable. 

Liang Court is also bringing back their popular Signature Food Trail. Shoppers actually purchase coupons to enjoy 3 set meals, 1 quick bit and grab a FREE beer or drink for only $40 at any of their 25 participating F&B outlets from Mondays to Thursdays during the campaign period. Coupons are available for purchse at Level 2 customer service counter (cash payment only) while stocks last. 
ARMF II (Liang Court) Pte Ltd

177 River Valley Road
#05-17/18 Liang Court
Singapore 179030
Tel: 6338 6933 (General)
Fax: 6338 6151
Website: www.liangcourt.com.sg

Blog post disclaimer: This is not a sponsored post, no monetary compensation was received and all views expressed are my own. 

BonbonRibbon Bento ぼんぼんりぼんのキャラ弁

$
0
0
BonbonRibbon Bento!

Since today is my birthday, I decided to make a special bento for myself~heheh. 

I am a huge fan of rabbits and bunnies (most of my close friends know this) and decided that what can be better than making a bunny character for my bento today :)

So I made BonbonRibbon character! Do you know BonbonRibbon? This character was introduced by Sanrio in 2012. An adorable pink bunny character with a signature polka dot ribbon bow on her head and in some places of her body include her feet and hands. 
BonbonRibbon riceball was colored naturally using salmon flakes. You can make your own salmon flakes or buy commercially available ones which are very yummy too - they are sold in glass jars at Japanese supermarkets. 

To make your own salmon flakes, simply bake the salmon fillet in the oven until cooked through, remove the skin and ensure that all bones are removed. Using fork or chopsticks, flake the fish. Add in some salt to flavour - super easy! You might ask me why not grill or panfry the salmon, reason is because you do not want browning of the salmon to keep the pink color :)

The features of BonbonRibbon was cut from seaweed while her ribbon was made from two types of ham - chicken ham and picnic ham. 

Since this is a birthday bento, I decided to also make a small 'cake' made from Japanese roll egg, ham, cheese and a strawberry bento pick. I have made this before in my Candy Bento & Recipe but here is a quick glance at the making:
The side dishes for today's BonbonRibbon Bento were pan-seared salmon fillet, sauteed french beans with sliced mushrooms and some lettuce. I also added some ribbon-shape pasta to match BonbonRibbon! And strung some edamame beans using ribbon shape bento picks!

I hope you like this bento, have a great Monday and a good week ahead!

Follow my food art and bento creations on Facebook, LIKE my page here. :)

キャラ弁ランキング
ブログのランキングに参加中。よろしければクリックしてくださいね♪ ありがとう
Please support my blog ranking! Please just click the button below as the clicks will go towards the ranking! Thank you so much
↓ ↓ ↓ ↓ ↓ ↓ ↓  ↓  
にほんブログ村 料理ブログ キャラ弁へ 

Kiiroitori Japanese Curry Rice Bento キイロイトリのカレーライス・キャラ弁

$
0
0
 
Kiiroitori Japanese Curry Rice Bento!!

A lazy morning since its the day after my birthday celebration, I decided to 'take it easy' and make a super cute Kiiroitori Japanese Curry Rice Bento! 

It was so super yummy, the combination of the omelette rice and Japanese curry! (was eating some of the leftovers after packing my bento - haha) And it was super easy and quick. To make this bento, I tried out the new tool that I got - the latest San-X Rilakkuma Rice Kit Set. 
I absolutely love this new tool!!! I tried out the Kiirotori mold today, can't wait to try out the Rilakkuma one too! This is so perfect for curry rice, rice in stew or foodart when plated! So kawaii right? Haha I somehow have a weakness for these characters~~

Here are some of my views on the San-X Rilakkuma Rice Kit Set. The set is very comprehensive,consisting of:
- Rilakkuma/Korilakkuma rice mold
- Kiiroitori rice mold
- Cutter for facial parts
- Cutter for seaweed parts
- Rubber cutting board
- Pictorial instruction booklet
The inside of the rice molds are a dotted rough surface, allowing the riceball to be removed easily. It also made the washing a breeze. However, I do have a 'trick' when using rice molds which I will share more below. 

The cutters both for the seaweed and ingredients for the facials parts were a no-brainer. Bento lovers, experience makers and beginners will all love the ease of making these characters. 

Another point is that the items are all rather compact and will not take up too much space in the storage. This is often that of Japanese products - very nice!


Kiiroitori Curry Rice Bento - Tutorial for San-X Rilakkuma Rice Kit Set :) 

This will show you a clearer idea of how the tools were used and also some tips!

Ingredients
approx 1/3 cup japanese rice (cooked)
2 small eggs
1 tbsp milk
boiled carrot slice
1/4 seaweed sheet
Japanese curry with your favorite ingredients

Method
(1) Rinse the Kiiroitori rice mold under the tap, shake off the excess water. 
(2) Fill and measure out the rice by packing the rice loosely in the Kiiroitori rice mold 
(3) In a bowl, mix the egg and milk. Heat up the nonstick pan and cook the egg under medium low heat. Avoid burning the egg. keep stiring as you cook to create a nice fluffy scrambled egg. 
(4) When the egg is almost cooked through, add in the rice and mix again. Using a slicing action as you cook and mix the rice. You will get a nice omelette fried rice. 
(5) Rinse your Kiiroitori rice mold again and shake off the excess water. Now pack the omelette fried rice tightly in the mold, making sure that the rice reaches the sides/contours. 
(6) Flip it over onto your bento box or plate. While holding on to the mold and the base, give it a knock on the tabletop (this is to help release the riceball) and gentle lift up the mold. 
(7) Using the cutter, cut the boiled carrot slice for the mouth. 
(8) Using the seaweed cutter and cutting board, punch out the seaweed parts.
 (9) Assemble the parts on Kiiroitori riceball. 
(10) Serve with yummy Japanese curry with your favorite ingredients. Over here, my Japanese curry had carrots, minced meat and mushrooms!
Follow my food art and bento creations on Facebook, LIKE my page here. :)


キャラ弁ランキング
ブログのランキングに参加中。よろしければクリックしてくださいね♪ ありがとう
Please support my blog ranking! Please just click the button below as the clicks will go towards the ranking! Thank you so much
↓ ↓ ↓ ↓ ↓ ↓ ↓  ↓  
にほんブログ村 料理ブログ キャラ弁へ 

Domo kun Nutella Sandwich Bento どーもくんのサンドイッチキャラ弁

$
0
0
Packed myself a fun breakfast today  - Domo kun Bento!

It has been sometime since I last made this adorable mascot character from NHK broadcasting network - Domo kun! His large mouth and expression always make me smile~~

Today's bento was packed in my white monbento (I only used single tier today) from Bento&co. No molds were used to make Domo-kun sandwich! I will share with you the recipe tutorial on how to make this cute bento!
Since this is for breakfast, I decided  to make a Domo kun Nutella sandwich. This is really easy and yummy! I also packed in some steamed corn, yogurt, strawberries and lettuce to complete this bento. 

I even made 'yogurt-art' hahah, Like how latte art is done, I used some dark chocolate sauce and drew domo's face on the yogurt!~

I managed to take some pictures of the step by step pictures which I think you will like it. Enjoy this recipe tutorial!


Recipe for Domo kun Nutella Sandwich Bento

Ingredients
white bread 2 slices
Nutella chocolate spread
strawberry jam
strawberry
cocoa powder

Method
1) Draw the desired Domo-kun design on a piece of paper. Cut it out following the drawn outlines using scissors. 
2) Place the cut out from step 1 on one slice of bread, use it as a guide and cut Domo-kun's body (omit the arms). Repeat on the second slice of bread. I used a combination of knife and scissors for this. 
3) Using the remaing ends of the bread at the sides, cut the arms for Domo-kun. I use scissors to cut it. 
4) To make Domo's eyes, spread Nutella on some of the remaining. Then use a puncher or straw and create two small round cut outs from the remaining bread pieces. 
5) Take one of Domo-kun's cut out from step 2 and cut out a rectangular for the mouth. 
6) Flatten the rectangular piece of bread, using scissors, trim and cut the zig-zag ends for Domo-kun's teeth. 
6). Spread Nutella on the bread from step 5, covering the sides as well. Spread Nutella on the 'arms' from step 3, covering the sides as well. 
7) On the remaing piece of bread from step 2, spread some strawberry jam (you can omit if you dont like), then place a thin slice of strawberry at the spot where the mouth will be. 
8) Dust some cocoa powder on the two small round cut outs from step 4. Give it gentle pat all around and it will darken. This is for Domo-kun's eyes. 
9) Stack and assemble the pieces together to complete Domo-kun Nutella Sandwich, and pack it in your bento! You are done ;)


Follow my food art and bento creations on Facebook, LIKE my page here. :)

キャラ弁ランキング
ブログのランキングに参加中。よろしければクリックしてくださいね♪ ありがとう
Please support my blog ranking! Please just click the button below as the clicks will go towards the ranking! Thank you so much
↓ ↓ ↓ ↓ ↓ ↓ ↓  ↓  
にほんブログ村 料理ブログ キャラ弁へ 

Homemade Strawberry Mango Fruit Tart Recipe イチゴとマンゴーのフルーツタルトレシピ

$
0
0
Made this Strawberry Mango Fruit Tart for Father's Day earlier on. 

Since I overslept today (so no bento!) haha, I decided to share with you this yummy strawberry tart I made. I had also made a mango rose tart, but perhaps I will leave that for another post.

I have made several tarts already, but this time I had tried a new tart crust recipe. While everyone who ate it really loved it and commented that the crust was good. I found the tart crust harder to work with as the dough was a lot softer and it was quite crumbly after baked (so please be gentle when removing from tart tin.

I also tried my head to knead the dough (challenging and tad messy) but the experience was pretty great. Though I might just go back to my old recipe and hand held mixer :P

If you are keen to make this tart, below is the new tart crust recipe and custard filling recipes. The fruits is really up to your liking, but I do recommend tangy fruits to balance the taste of the custard filling.

Don't worry, alternatively, you can go back to my old but trusty tart crust recipe here.

Recipe for Strawberry Mango Fruit Tart


(makes 2 fruit tarts, about 14cm)

(1) Tart Crust
160g plain flour
35g egg yolk
20g almond powder
95g unsalted butter
55g powdered sugar
1.2g salt

Method
- Knead the soften butter with plain flour until incorporated.
- Add in almond powder, sugar, egg and salt. Knead and mix well until the dough is formed. 
- Wrap the dough in cling wrap and let it set in the chiller for 1 hour. 
- Remove from chiller, roll out the dough. Lay them over your tart tins and fill the tart tins. 
- Place a small sheet of baking paper and fill the tarts with pie weights. Make sure you fill the sides as those are the areas that are prone to shrinkage. 
- Bake at 170C for about 25mins until nicely brown. Remove and let it cool before filling the tart.

(2) Custard Cream 
300ml of milk
90g sugar
30g corn flour
3 egg yolks

Method
- Heat milk in a small saucepan until boiling, remove from heat. 
- Add in the rest of the ingredients and mix well. 
- Return saucepan to stove on low heat. Keep stirring as the mixture thickens. It would resemble a thick texture. 
- Remove from heat, transfer the custard cream into a container and store in the chiller for at least 1 hour before use. The custard cream will harden just a little when chilled. 


(3) Glaze for strawberries
20g of strawberry jam
1~1.5 tsp water (*adjust depending on the thickness of your jam)
a few drops of lemon juice
- Heat the above mixture in a microwave for 20seconds at 700W
- Let it cool slightly. Using a pastry brush, brush a thin layer on top of the strawberry fruits. This will give it a nice shine!

If you have time, do check out my other tart creations :)
  • Homemade Yogurt Mousse Fruit Tart 自家製ヨーグルトムースのフルーツタルト (post)
  • Mixed Fruit Tart Recipe フルーツタルトのレシピ (post)
  • Strawberry and Kiwi Homemade Fruit Tart イチゴとキウイのフルーツタルトレシピ (post)
  • Raspberry Dark Chocolate Tart Recipe チョコレートタルト・バレンタインのレシピ (post)
  • Homemade Strawberry Fruit Tart 自家製イチゴのフルーツタルト (post)

Follow my food art and bento creations on Facebook, LIKE my page here. :)

ブログのランキングに参加中。よろしければクリックしてくださいね♪ ありがとう

Please support my blog ranking! Please just click the button below as the clicks will go towards the ranking! Thank you so much
↓ ↓ ↓ ↓ ↓ ↓ ↓  ↓  
にほんブログ村 料理ブログへ  

Maleficient Bento マレフィセントのキャラ弁

$
0
0
 
Maleficient Bento! 

Has anyone already watched the Maleficient movie currently screening in cinemas now?

Maleficient is one of the latest film starring Angelina Jolie as Maleficient, the antagonist character from Walt Disney's Sleeping Beauty. The twist is that the story unfolds from the perspective of this well-known 'villian' who is not such a villian afterall. I hope to find time to head to the movie theatres!

Decided to make a Maleficient Bento today :) It took slightly longer than I expected as I was trying to include the wings as well.I hope you like this. 

The ingredients for Maleficient were actually really easy:
Body, Head, Headgear (rice, seaweed)
Wings, collar (kombu)
Facial features (seaweed, crabstick)

The side dishes for today's bento were sauteed tofu with lotus roots and pumpkin, sauteed kailan vegetables with carrots, lettuce and steamed corn. I also added some spider and bat pasta pieces to reinforce the 'mood' of the bento theme :P haha. 

Today's bento was packed in my Take Bako box from Bento&co. :)

TGIF - Have a maleficient weekend! 

Follow my food art and bento creations on Facebook, LIKE my page here. :)

キャラ弁ランキング
ブログのランキングに参加中。よろしければクリックしてくださいね♪ ありがとう
Please support my blog ranking! Please just click the button below as the clicks will go towards the ranking! Thank you so much
↓ ↓ ↓ ↓ ↓ ↓ ↓  ↓  
にほんブログ村 料理ブログ キャラ弁へ 

Milky Peko-chan Bento ペコちゃんのキャラ弁

$
0
0
Peko-chan is the female mascot of the Milky Candy from Fujiya, Japan. Peko-chan with her cute little pigtails is popular in Japan, there is even dedicated character stores. I spotted one at Tokyo JR Station, along the Character Street. 
Ever since I bought the Peko-chan bento baran sheets, I had wanted to try making this character for my bento. Finally did it today! 

Last night, while shopping at the supermarket, I was thrilled to find Japanese red cherries! I have been seeing photos of them online, posted by my Japanese friends and they look so pretty and sweet tasting! These Japanese cherries are smaller than the usual ones we see at supermarket. They are smaller, lighter in color and redder in tone. 
Somehow buying those cherries made me think of making Peko-chan. In this bento, she is looking at the sweet delicious cherries and smacking her lips! heheh. Peko-chan is entirely edible, and was made from chicken ham, picnic ham, seaweed, kani kamaboko and aburaage. 
*kani kamaboko is imitation crabstick
*aburaage is fried tofu pockets, the ones used in inari sushi

To make Peko-chan, I sketched out the design. I then used some baking paper to trace the different layers and subsequently cut out the parts using the different ingredients. 
Peko-chan is on some pepperoni and mushroom pasta, at the side I have some sauteed broccoli and carrots, and some of the lovely Japanese cherries I bought!

Hope this bento cheers up your Monday morning - have a good week ahead!

Follow my food art and bento creations on Facebook, LIKE my page here. :)

キャラ弁ランキング
ブログのランキングに参加中。よろしければクリックしてくださいね♪ ありがとう
Please support my blog ranking! Please just click the button below as the clicks will go towards the ranking! Thank you so much
↓ ↓ ↓ ↓ ↓ ↓ ↓  ↓  
にほんブログ村 料理ブログ キャラ弁へ 

Totoro Bento & Totoro Macarons Creative Collaboration トトロのキャラ弁

$
0
0
Totoro Bento!

Presenting to you the first creative collaboration between myself and Vickii from V's Kitchen! :)

Since we are both big fans of Japanese stuff and also Totoro, we decided that it will be super awesome to come together to create something that we both love - Totoro!! Check out the super cute Totoro macarons made by Vickii for my bento!
Don't we all love Totoro? ^ ^

For this bento creation, I made Totoro onigiri (rice ball). The side dishes were baked salmon, tamagoyaki (Japanese egg omelette), broccoli, lettuce and some sauteed mushrooms with truffle oil.

To make Totoro rice ball, simply shape the Totoro's body then wrap the seaweed sheet around. I cut a circle for the 'tummy' and slits along the edges of the seaweed sheet before wrapping. Totoro's ears were also made from seaweed and rice and eyes were made of egg sheet (egg white only) and seaweed. The chibi mini Totoro was even easier, using just rice for the body, egg sheet and seaweed for the eyes!
Me and Vickii became friends after meeting at an event and subsequently keeping close contact on Instagram. Vickii is an aspiring marketer and a self taught baker. She makes really awesome macarons, cakes and even granola. Check out her beautiful creations on her blog here.

Her black sesame Totoro macarons were really yummy! I usually find macarons too sweet for me, but hers was not! The fragrance of the sesame was superb, the macarons had perfect feet, was nice and airy, with creamy sesame center sandwiched between. Super yum, I had to stop myself after popping two in less than 5 mins! haha.

Ahh... love Totoro!

Today's bento was packed in my Magewappa Classic Bento Box from Bento&Co. 

Follow my food art and bento creations on Facebook, LIKE my page here. :)

キャラ弁ランキング
ブログのランキングに参加中。よろしければクリックしてくださいね♪ ありがとう
Please support my blog ranking! Please just click the button below as the clicks will go towards the ranking! Thank you so much
↓ ↓ ↓ ↓ ↓ ↓ ↓  ↓  
にほんブログ村 料理ブログ キャラ弁へ 

Ice Cream Bento アイスクリームのキャラ弁

$
0
0
"Ice Cream" Bento! - having an "ice cream' diet today :P

Just when I thought the weather was slightly cooler after two mornings of rain showers, this morning was so warm! haha. The sun feels stronger and brighter even earlier than usual :P

With the weather being crazy hot most of the time lately, it is now literally a conversation starter. "The weather is so hot~" and this would be met with numerous nods in agreement, or replies of agreement~~lol

Since it is so warm today, I decided to make myself an ice-cream bento - to 'cool down' in this hot humid summer weather! Heheh

This was a really yummy, cute and simple bento to make. 
I made two ice cream characters for the bento, one was an ice cream bar and the other was ice cream cone!

The brown colored rice is actually fried rice (yum!!) which I made by stir frying some cooked Japanese rice, egg, dark soy sauce, sea salt and pepper.

Ingredients for the characters for the ice cream bento:
Ice Cream Bar (fried rice, cheese, seaweed, chicken ham). For the wooden handle, I used a wooden flat spoon.
Ice Cream Cone (fried rice, aburaage, rice, arare, seaweed, chicken ham)
*aburaage is fried tofu pockets, commonly used in inari sushi. I used those pre-prepared and seasoned ones which can be used straight from the pack. 
*arare is a type of bite size japanese crackers made from glutinous rice flour. I used the ones which are multi-colored and shaped as tiny balls. 

The side dishes were pan fry chicken breast meat with soy and kiwi relish, sauteed french beans with carrots and Japanese cherries. 

Today's bento was packed in my white monbento box from Bento&co
Follow my food art and bento creations on Facebook, LIKE my page here. :)


キャラ弁ランキング
ブログのランキングに参加中。よろしければクリックしてくださいね♪ ありがとう
Please support my blog ranking! Please just click the button below as the clicks will go towards the ranking! Thank you so much
↓ ↓ ↓ ↓ ↓ ↓ ↓  ↓  ↓
にほんブログ村 料理ブログ キャラ弁へ 

Ume Blossom (Japanese Plum) Kazarimakisushi Bento 梅の木飾り巻き寿司お弁当

$
0
0
Ume Blossoms (Japanese plum) Kazarimakisushi (Sushi art roll) Bento today!

Somehow I was not in a mood to make cute characters today and decided to pack myself a sushi art roll bento. Amongst the many designs I have made, this Ume Kazarimaki sushi art roll design has to be one of my favourites.  Hehhe hope I do not bore you by making this sushi art roll design again today! There are always slight variations each time I made them though ;)

The colors are different from what I have made earlier, this time, I used cheese sausage at the centre, and the flower peters are also neater but I do kind of like the version I made earlier using shredded egg at the flower center. 
The ingredients for the Ume Blossoms (Japanese plum) Kazarimakisushi (sushi art roll) were:
- Ume blossom was made from pink sushi rice (rice + sakana no oboro + pink sushi mix powder), cheese sausage
- Tiny ume flower buds was made from seaweed, japanese cucumber and sakana no oboro
- Stem was made from kanpyo and seaweed
*Sakana no oboro is sweet pink fish flakes, which is made from white fleshed fish, mirin, sake, sugar, salt and some red food coloring to make it pink.
*Kanpyo is gourd strips, the ones used here are seasoned and can be used straight from the pack
The side dishes for today's bento included baked teriyaki salmon fillet, sauteed french beans with carrots, mushrooms and steamed sweet corn. I added a couple of the Japanese cherries I bought couple of days back too (I am still so in love with their colors!).

I hope you like this sushi art roll bento!

It has been some 8 months since I was certified in Tokyo at Tokyo Sushi Academy under the Japan Sushi Instructor Association for kazarimaki sushi, it has been such a wonderful experience (read more here) and I look forward to making more sushi rolls, and coming up with new sushi recipes for you!

Mentioned earlier, here is the other Japanese plum blossom sushi art roll that I made earlier this year in March :) Read the post here
And here is the Olaf Sushi Art Roll Recipe that I blogged earlier too (read more here)
Follow my food art and bento creations on my Facebook pageor Instagram. :)

キャラ弁ランキング
ブログのランキングに参加中。よろしければクリックしてくださいね♪ ありがとう
Please support my blog ranking! Please just click the button below as the clicks will go towards the ranking! Thank you so much
↓ ↓ ↓ ↓ ↓ ↓ ↓  ↓  
にほんブログ村 料理ブログ キャラ弁へ 

Totoro Melon Pan Bread Recipe トトロのメロンパン作り方・レシピ

$
0
0
Totoro Bread!!

It has been a while since I made character bread! I hope you like this cute Totoro Bread - Homemade Chocolate Melon Pan :) 

The only thing I would have done different would be to do away with the white base for the nose. Since my chocolate paste is dark enough for the features to be seen even directly on the chocolate bread (see the whiskers) :D So for my recipe, I mentioned this change as well. 

Yes! Recipe is below, I hope you like this fun bread recipe. 

Interestingly when I learnt bread making from the Japanese chefs in Tokyo, that was when I realised that melon pan (melon bread) with that lovely sweet crust on the buns actually do have melon juice (just a little)!  If you are not a fan of melons, don't worry - you can omit this if you prefer, or even swap it for a few drops of vanilla essence or add some vanilla bean paste. 
Actually I made this last week, but did not have time to share this until this week. The bread was yummy and I like how it was not too sweet, even with the sweet melon crust. 

It is also important to use good cocoa powder for your bread as I think the cocoa flavour plays an important role. In this bread recipe, I used valrhona cocoa powder. 

今度可愛いトトロのメロンパンのレシピを紹介します~トトロが皆さんも好きですか?トトロ可愛いですね~~

チョコメロンパンは美味しかったです。レシピは下です。見てみてください。

Totoro Bread - Recipe for Chocolate Melon Pan

Ingredients (Bread)
bread flour 250g
cocoa powder 10g
sugar 2tbsp
salt 1g
warm water 150ml
instant yeast 1.5 tsp
butter 10g

Ingredients (Melon Crust)
cake flour 120g
butter 28g
sugar 70g
egg 40-45g
melon juice 5g (optional)

Ingredients (Chocolate paste for drawing features)
dark cocoa powder 1-1.5tbsp
water

Method
  1. Sieve the bread flour and cocoa powder into a large mixing bowl.
  2. In smaller bowl, add in sugar and the warm water. Then add in instant yeast in the mixture, mix well using a pair of chopsticks.
  3. Then transfer the mixture to the dry ingredients in step 1 and add in soften butter. Keep mixing and kneading until a smooth stretchy dough is achieved.
  4. Shape the dough into one big ball, place it in a bowl, cover with cling wrap and let it rise. Depending on the temperature and humidity, the first rise usually takes about 50-60mins.
(while waiting for the bread to rise, prepare your melon bread crust)
  1. Mix soften butter, sugar, egg and cake flour, and melon juice (optional) in a bowl until it comes together. Then roll the dough out between cling wrap and chill in the fridge.
(after first rise)
  1. After the first rise, the dough will double in size. Do the finger test, then punch out the air. Knead and divide the dough into 6 servings.
  2. Divide the 6th ball into smaller pieces to make the ears for the Totoro. You will need to make 5 pairs of ears for the other 5 bread buns.
  3. Cover with damp cloth and rest for 2nd rise (about 10mins).
(after 2nd rise - decorative parts for bread and baking)
  1. Remove the melon bread crust from the fridge. Use a round cutter to cut the tummy for totoro, place it on the bread bun. Then pinch the bread bun from the back and dip in a bowl of caster sugar to coat the melon crust. Repeat for remaining buns.
  2. You can use a knife/small spoon etc to make some indentations on the tummy of Totoro.
  3. Then use a small round cutter to cut the base of Totoro's eyes. (there is no need to cut the nose like what I did - I think it will look nicer :P)
  4. Cover with wet cloth again for 3rd rise (about 10mins).
  5. In the meantime, prepare the cocoa mixture for to draw the totoro features. Mix dark cocoa powder with just enough water (or leftover egg) that it becomes a paste. Transfer the cocoa paste into a piping bag with fine small tip (I use tip 1). Draw Totoro's features: eyeballs, nose, whiskers.
  6. Bake the bread buns in the oven at 170-180C for about 15mins until cooked through.
Follow my food art and bento creations on Facebook, LIKE my page here. :)
ブログのランキングに参加中。よろしければクリックしてくださいね♪ ありがとう

Please support my blog ranking! Please just click the button below as the clicks will go towards the ranking! Thank you so much
↓ ↓ ↓ ↓ ↓ ↓ ↓  ↓  
にほんブログ村 料理ブログへ  

Pororo Bento Workshop at Square 2

$
0
0
Pororo Bento (Pororo Dosirak!)

Perfect for the Korean theme workshop that Square 2 has invited me to teach this coming week and the week after next! Please come join me to make bento together!!

Limited spaces left for 20 July 2014~!

K-Style at Square 2 (visit event website page)
Pororo Dosirak (Bento) Workshop
(Korean Cooking Workshop segment)
Participant: Parent + Child pair
Dates: 6 July 2014 (Full) and 20 July 2014 (limited spaces)
Time: 2 - 3pm
*registeration is required

This hands-on bento workshop (Korean Cooking Workshop) is open to all shoppers who spend at least $80 ($130 for fairprice receipts) - simply register you and your child for the workshop with Square 2 Customer Service Counter. 


Pororo is actually a penguin character from a South Korean cartoon series. The cartoon series has been aired even outside of Korean .Popular with children in Korea, Pororo cartoon episodes revolve around the challenges that Pororo and his friends face and overcome.

Pororo's signature look is his large aviator googles and brown aviator cap which is what I focused on for the bento character. 

Interested to watch the cartoon? I found Pororo TV channel on Youtube here, they have Korean and English versions of the cartoon series there. 
SQUARE 2
10 Sinaran Drive, Singapore 307506 (Novena MRT Station)
Open daily 11am to 10pm
Tel: 6397 2288
www.square2.com.sg


Follow my food art and bento creations on Facebook, LIKE my page here. :)


キャラ弁ランキング
ブログのランキングに参加中。よろしければクリックしてくださいね♪ ありがとう
Please support my blog ranking! Please just click the button below as the clicks will go towards the ranking! Thank you so much
↓ ↓ ↓ ↓ ↓ ↓ ↓  ↓  ↓
にほんブログ村 料理ブログ キャラ弁へ 

Bento&co 2014 International Bento Contest

$
0
0
Morning! Bento&Co is organising the 6thinternational bento contest! Are you ready? How exciting~~~

Don’t be shy, there is still 2 days left to submit your entry! Submission closes on 4 July at 11:59am (Japan Standard Time). Read more about the contest rules and regulations here.

The prizes are extremely attractive! 

Get to win a trip to Kyoto and 2 nights stay at Kyoto Park Royal Hotel~ WOW~

This year’s competition topic is really interesting!

Titled as ‘Our Ingredients, Your Bento!’  You will have to make a bento using 6 pre-determined food ingredients (and one food ingredient of your choice). There will also be special attention paid to the culinary skills.
I think this year’s contest has just went up a notch and it will push the participants to be really creative in their bento!

I really like how the contest rules make it more fun this year. So I decided to make a bento following the rules as well. I won’t be entering this creation in the contest though, it’s more a challenge I posed for myself.

Plus I was preparing a video shoot for a Japan TV show so I had to make a bento anyway, decided to try my hands to create a bento out of the 7 ingredients. 

So my choice of ingredient is seaweed!

In this bento, I wanted to make use of the pre determined ingredients to make a creation. So I made a poppy flower kazarimaki sushi (sushi art roll) out of carrots, rice,  broccoli and seaweed). 

The side ingredients included tamagoyaki (egg), grilled potatoes and cherry tomato, broccoli and baked honey soy chicken wings. 
Follow my food art and bento creations on Facebook, LIKE my page here. :)


キャラ弁ランキング
ブログのランキングに参加中。よろしければクリックしてくださいね♪ ありがとう
Please support my blog ranking! Please just click the button below as the clicks will go towards the ranking! Thank you so much
↓ ↓ ↓ ↓ ↓ ↓ ↓  ↓  ↓
にほんブログ村 料理ブログ キャラ弁へ 

Sleeping Bear Bento 寝てくまさんのキャラ弁

$
0
0
Sleeping Bear Bento! Are you feeling sleepy this morning like I do? :P

Once again, a reminder that 2014 Bento&co's international bento contest submission deadline is tomorrow (4 July) at 11:59am (JST) ! Read more about the contest details, rules and regulations here. Stand to win a trip to Kyoto and 2 nights stay in a prestigious hotel!

As I am an affiliate partner of Bento&co, I am not able to take part in this exciting competition. But I love the topic for this competition and made this bento anyway. Will not be submitting though. 

Following "Our ingredients, your bento!" I made this Sleeping Bear Bento, using the 6 pre-determined ingredients and one ingredient of my choice - seaweed. 

Once again, I wanted to highlight the use of the pre-determined ingredients and creatively use them to create something. 
The sleeping bears were made from mashed potato and seaweed. The pillows were carrots. And the cute star pattern blanket was egg sheet. 

The side dishes to accompany this bento included baked honey chicken wings, tomatoes and sauteed broccoli and carrots. 

The bento was packed in my Take Bako bento box from Bento&co.

It is almost Friday! Hang in there for weekend~~
Follow my food art and bento creations on Facebook, LIKE my page here. :)


キャラ弁ランキング
ブログのランキングに参加中。よろしければクリックしてくださいね♪ ありがとう
Please support my blog ranking! Please just click the button below as the clicks will go towards the ranking! Thank you so much
↓ ↓ ↓ ↓ ↓ ↓ ↓  ↓  ↓
にほんブログ村 料理ブログ キャラ弁へ 

Tanabata Bento 七夕のキャラ弁

$
0
0
Tanabata Bento - Cowherd and the Weaver Girl!

Tanabata is Japanese Star Festival, with its origins tracing back to the Chinese Qixi Festival. Held on July 7th every year, the festival celebrates the reunion of Hikoboshi (Cowherd) & Orihime (Weaver Girl), who were separated by the Milky Way and were allowed to meet just once a year. 

What a sweet and touching love reunion, only once a year they met!!

Here is a traditional Tanabata song for you:

ささのは さらさら
のきばに ゆれる
お星さま きらきら
きんぎん すなご
ごしきの たんざく
わたしが かいた
お星さま きらきら
空から 見てる


The bamboo leaves rustle,
shaking away in the eaves.
The stars twinkle
on the gold and silver grains of sand.
The five-colour paper strips
I have already written.
The stars twinkle,
they watch us from heaven.

To create the look of the milky way reunion, I cooked Japanese harusame noodles.

Harusame are transparent japanese noodles made from potato starch or mung bean starch. It is similar to glass noodles but more the taste texture is chewy and the noodles are thicker. They are really good for stir fry, soups, salads and even in dessert dishes! I personally prefer them to the usual thin glass noodles. 

Beneath the harusame noodles is yummy minced meat and sauteed french beans and mushrooms. They matched perfectly with the noodles!

For the milky way, I used shredded Japanese cucumber. The stars were made from thin egg sheet, features were saweed and pink edible writing gel for the cheeks.

The side dishes were Japanese cherries, soft boiled egg (success!) and more of the minced meat and vegetables in the food cups. 

The ingredients for the main characters were:
Hikoboshi (Cowherd) - quail egg, cheese, seaweed, egg sheet
Orihime (Weaver Girl) - quail egg, cheese, seaweed, egg sheet, shaved pink kamaboko, flower character furikake

How to color the eggs?
The quail eggs were colored with some food coloring, just very little. The technique is the same as the easter eggs recipe I blogged earlier. 
See post and recipe here
Follow my food art and bento creations on my Facebook my page here or my Instagram here. :)


キャラ弁ランキング
ブログのランキングに参加中。よろしければクリックしてくださいね♪ ありがとう
Please support my blog ranking! Please just click the button below as the clicks will go towards the ranking! Thank you so much
↓ ↓ ↓ ↓ ↓ ↓ ↓  ↓  ↓
にほんブログ村 料理ブログ キャラ弁へ 

[New Store] Tai Parfait in Singapore

$
0
0
OMG OMG! Tai-Parfait from Tokyo opens in Singapore, at Bugis Junction!!

Tai-Parfait is a new Taiyaki sweets store that has opened in Singapore. Tai-Parfait has been gaining many fans in Tokyo with their super kawaii and cute Taiyaki sweets. I first saw the online when some Japanese news feed started sharing them.

Tai-Parfait has two outlets in Japan and Singapore is their first overseas store! Awesome!

For those of you who do not know what Taiyaki is - translated as baked sea bream, it is a type of Japanese waffle-like dessert that is shaped as fish. The traditional ingredients include custard and redbean fillings.
What Tai-Parfait has done is to give this traditional sweet a modern twist. The special taiyaki machines makes the taiyaki with open mouth, where it is filled with ice cream and the toppings you request for. The body of the Tai-Parfait is a choice between custard or red bean.
There are so many flavours to pick from:

  • Tai-Parfait Hokkaido Soft Serve ($5.90)
  • Tai-Parfait Hokkaido Soft Serve with Honey Comb ($6.90)
  • Tai-Parfait Strawberry Chocolate ($4.90)
  • Tai-Parfait Strawberry Cream ($4.90)
  • Tai-Parfait Strawberry Caramel ($4.90)
  • Tai-Parfait Banana Cheese Cream Crunch ($4.50)
  • Tai-Parfait Banana Chocolate ($4.20)
  • Tai-Parfait Banana Caramel ($4.20)
  • Tai-Parfait Match & Azuki ($4.90)
  • Tai-Parfait Kinako & Brown Sugar ($4.50)
  • Tai-Parfait Mixed Fruits ($4.20)
Being the matcha fan, I picked matcha and azuki ($4.90).

The taiyaki's body was filled with azuki (red bean paste), and the top was ice cream, with matcha custard, matcha powder and more azuki.

Verdict? It was pretty good - the taiyaki had a really nice waffle like texture, and a little chewy too (see super close up picture below)! 

I did however wished there was more ice-cream though, haha. The ice cream with the taiyaki was a fab combination. I also liked that they make it fresh only when there are orders :) I would also think custard could be better as Matcha & Azuki with more azuki filling was tad sweet when I finish the top filling.
On my next visit, I want to try Hokkaido soft serve (i think it has more ice cream - HAHA) and also the Kinako Brown Sugar. 

Can't wait to go back!!

I can imagine that this is going to get crowded, especially with the young crowd at Bugis. The shop was quite packed even when I visited on a weekday afternoon. No to worry as they have a queue system, make your order at the cashier, then wait for your number to be called. 

Tai-Parfait (Singapore store)
200 Victoria Street
Bugis Junction #B1-03A
Singapore 188021
Tel 6333 1500
Facebook (English): http://www.facebook.com/TaiParfait
Website (Japanese): http://tai-parfait.com/

Blog Post disclaimer: This was not a sponsored post. I paid for my own purchases and all views expressed are my own. 

Transformers Bento Optimus Prime

$
0
0
 
Transformers Bento! Tried to make Optimus Prime in my bento today - hahah I think I can do better, but I do like the look of the fist. It does look like the Transformers is fighting and punching right? Heh

The hardest part for today's Transformers Bento was Optimus Prime's eyes. But I think I managed okay. 

Just watched Transformers 4: Age of Extinction over the weekend!! Super Awesome!

Prior to the journety to the movie theatres, I had thought that I would be making Bumblebee in today's bento, but Optimus Prime was way too cool! Super cool! I just had to try making this Optimus Prime Transformers Bento!

Optimus Prime is one of the key characters of the Transformers, leader of the Autobots, a group of transforming robots from planet Cyberton. A brave, wise and compassionate leader, who has selflessly protected planet Earth from other alien attacks. 

Check out some of the cool shots of Optimus Prime from Transformers 4 Movie. These images are not my own. 
Don't you just love Optimus Prime's new look in Transformers 4? 

I must say that I amazed myself sometimes at how much I enjoy some of these so-called boys/mens-type of movies, such as Transformers, X-men, Lord of the Rings, Hobbit etc. :P
A closer look at my Transformers Bento. 

The blue/red parts of Optimus Prime transformers was thin egg sheet, I simply added red coloring to the yolks and blue coloring to the whites. Then I pour them into the pan and use a chopstick to make swirls before cooking. Kind of like making marble cakes if you know what I mean. 

The other ingredients for Optimus Prime included: rice, ground black sesame, seaweed. For the eyes, I made it using rice, seaweed and edible pen. 

The side dishes included baked chicken wings, sauteed beans and sauteed tofu with lotus roots and carrots. 
Follow my food art and bento creations on my Facebook my page here or my Instagram here. :)


キャラ弁ランキング
ブログのランキングに参加中。よろしければクリックしてくださいね♪ ありがとう
Please support my blog ranking! Please just click the button below as the clicks will go towards the ranking! Thank you so much
↓ ↓ ↓ ↓ ↓ ↓ ↓  ↓  ↓
にほんブログ村 料理ブログ キャラ弁へ 
Viewing all 521 articles
Browse latest View live