
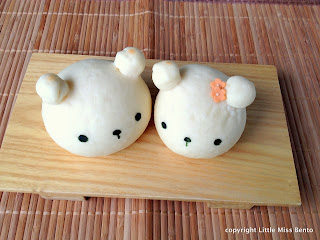
Baked teddy bear buns! Once saw something similar online so I decided to try making the cute bear bread buns too.
I hope you will enjoy my own recipe below - created a step-by-step pictorial guide alongside. See below! The buns were still soft and chewy until Day 2! Looks like this recipe is a keeper :) On Day 2 if you like, toast the bun for 5 mins before eating~ :)
I usually like my buns sweet, this bun is not really the sweet kind, so it is perfect for sandwiches or served with other savoury sides, or with jam and honey etc.
This birthday plate was for my hubby cause it was his birthday! So I made this specially for him. Was up till 1am the night before baking :P The breakfast plate comprised of the bear bread buns, scrambled eggs, bacon, broccoli, rilakkuma sausages, cucumber, cherry tomatoes and a yogurt side with fresh strawberries.
先週夫の誕生日です。これは夫の朝ご飯のために作りました。可愛い熊パンですよ。
パンはおいしいです。でも甘いあまりないです。皆さんも作ってみてください。
すみません、レツピは英語しかありません。

Recipe for Simple Japanese Bear Bread Bun (makes about 7 bears)
Ingredients
260g bread flour
1 tbsp Sugar
1 tsp salt
5g unsalted butter
1tsp instant yeast
150~160ml water
(Japanese):
材料
260g 強力粉
大さじ1 砂糖
1小さじ 塩
5g 無塩バター
1小さじ インスタントイースト
150〜160ml 水
Method
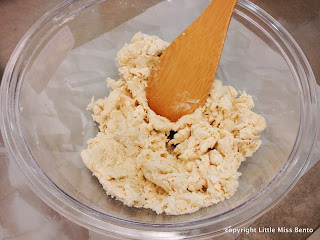
1. Sieve the flour into a large mixing bowl. Add sugar, salt, butter, yeast and water. Mix well. The dough will slowly form. Initially it looks like huge chunks and rather flakey.
2. Place the mixture on a worktop and knead well for about 12 mins or until the surface is smooth. The dough at this point does not stick to your hands.

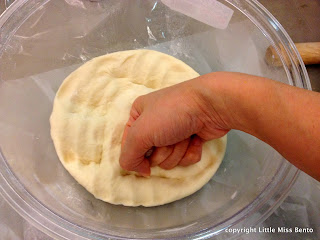
3. Shape it into a smooth ball of dough and set it in a large mixing bowl for the first rise. At room temperature, it will take out about 55mins to 65mins.

4. After the first rise, the dough will double in size. Do the finger test to ensure that the dough is ready.

5. Dust your fist with some bread flour and punch out the arm. Then scoop the dough on to your worktop again.
6. Divide the dough into 8parts. Roll them out and smooth into small bread buns. Cover with a wet lint free towel. Set aside for the second rise (10mins)
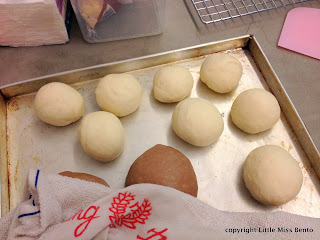
7. Roll out the dough again and shape them into small balls. For the 8th ball, divide and create small balls and place them on the larger buns. This is for the bear's ears.
You should have 7 bear bread buns. Cover with damp towel and set aside for 3rd rise (about 20~25mins)

8. Bake at 170 degrees for 10~12mins. To keep the buns 'white', midway through the baking, gentle place a aluminium sheet on top of the buns with the shiny side facing up.
ブログのランキングに参加中。よろしければクリックしてくださいね♪ ありがとう
Please support my blog ranking! Please just click the button below as the clicks will go towards the ranking! Thank you so much
↓ ↓ ↓ ↓ ↓ ↓ ↓ ↓ ↓
